/* scrip for google analytic */

Ads 468x60px

แสดงบทความที่มีป้ายกำกับ Project แสดงบทความทั้งหมด

วันพุธที่ 27 เมษายน พ.ศ. 2559

[Neo4j] สวัสดีชาวโลก! Hello World! ด้วย JAVA Implements กับ Neo4j

ในบทความนี้จะมาเล่าถึงวิธีการนำ Neo4j มา Implements ให้อ่านกัน
จากบทความที่ผ่านๆมา เป็นการปูพื้นก่อนที่จะนำ Graph Database มาใช้

ก่อนที่มาเริ่ม Coding ก็ให้มาติดตั้ง Environment ให้เสร็จเรียบร้อยก่อน ได้แก่

1. Java JDK
2. ติดตั้ง Path เป็น JAVA_HOME ให้เรียบร้อย
3. ติดตั้ง JAVA EE
4. ติดตั้ง Neo4j ให้เรียบร้อย

จากนั้นก็เริ่ม สร้าง Project ขึ้นมา select File -> new -> Java Project 


จากนั้นก็เริ่ม Build Path ของ Neo4j เข้ามาใน Library


กด Properties


วันเสาร์ที่ 7 พฤศจิกายน พ.ศ. 2558

[Project] แอพพลิเคชั่นสแกนบาร์โค๊ดลงฐานข้อมูลด้วยระบบแอนดรอยด์พร้อมป้อนข้อมูลรายละเอียดสินค้า (2)


จากบทความที่แล้วที่ผู้เขียนได้นำเสนอวิธีสร้างแอพพลิเคชั่นสแกนบาร์โค๊ดไป แต่ยังไม่ได้ทำในส่วนของฐานข้อมูลเอาไว้อย่างที่ตั้งหัวข้อเอาไว้ ฉะนั้นในบทความนี้ ก็จะสานต่อจากบทความที่แล้ว


บทความที่แล้วได้ ทำให้แอพพลิเคชั่นสามารถสแกนบาร์โค๊ดได้แล้ว โดยการนำค่าสตริงที่เก็บอยู่ใน Key String มาเก็บไว้ที่ตัวแปร 

ในความเป็นจริงในการทำสต็อกสินค้า เราจะทำการ สร้างบาร์โค๊ดสำหรับสินค้านั้นๆ แล้วจึงใส่รายละเอียดข้อมูลสินค้าเข้าไป เช่น ชื่อ, ลักษณะ, ราคา, ยี่ห้อ, ขนาด, ปริมาณ ฯลฯ แล้วแต่ยูสเซอร์ได้เลย ซึ่งบาร์ทำหน้าที่อ้างอิงข้อมูลเหล่านี้


คอนเซ็ปของแอพตัวนี้ ผู้เขียนต้องการทำเพื่อเก็บข้อมูลสินค้าในฐานะผู้ซื้อ ไม่ใช่ ผู้ขาย หมายความว่า ผู้ซื้อสามารถสร้างฐานข้อมูลของตัวเองเอาไว้ เพื่อความสะดวกในการซื้อสินค้าชิ้นเดิมในครั้งต่อๆไปในภายหลัง นั้นเอง

ส่วนในบทความนี้ ผู้เขียนจะพัฒนาในส่วนของ ฐานข้อมูลและการป้อนข้อมูลลงฐานข้อมูลเท่านั้น

ผู้เขียนจะสร้างระบบในการสแกนเพื่อนำมาสินค้ามารวมใน พร้อมแสดงผลออกมาดังรูปภายได้ ในภายหลัง


ร่วมสนับสนุนนักเขียนด้วยการคลิ๊กลิ้ง ด้านล่าง ขอบคุณครับ รับรองไม่มีไวรัส


มาดูตัวอย่างของแอพที่ผู้เขียนพัฒนาขึ้น


 ภาพนี้เป็นสินค้าตัวอย่างไม่ได้ค่าโฆษณาแต่อย่างใด ของแค่ได้ใจของผู้อ่าน ก็พอ ฮิ้ววววว

เอ้า มาต่อ


 เมื่อสแกนเสร็จเราจะเห็นว่า เราได้รหัส ที่อ่านได้ตรงตาม บาร์โค๊ด


มันจะเปลี่ยนหน้าที่นี้ ตามโปรแกรมที่เราเขียนเอาไว้ โดยค่าที่ได้จาก key string ในโค๊ดตัวอย่างในบทที่แล้ว มาใส่ใน Input text นั้นเอง


จากนั้น ก็ระบุรายละเอียดด้วยผู้ซื้อเอง


ดันกดนิ้ว Volume มาด้วย เมื่อกด ตกลง ก็มีข้อความขึ้นมาว่า เพิ่มข้อมูลเสร็จสิ้น เท่านี้ข้อมูลก็เข้าไปอยู่ในฐานข้อมูลเรียบร้อยแล้ว

มาดูตัวอย่างโค๊ดกัน โค๊ดคำสั่งที่สำคัญๆมีอะไรบ้าง

แต่ก่อนอื่นมาลองทำความเข้าใจกับขั้นตอนของระบบกันก่อน หรืออัลกอริทึมนั่นเอง สำหรับผู้ที่สนใจบางท่าน อาจจะมองปุ้ปรู้ปั้ม เหมือนจับวาง หรือเรียกว่า เมพ...ขิงๆ ก็ขออภัยก็แล้วกันนะครับ แต่เพื่อที่บางท่านอาจจะยังใหม่ในการเขียนโปรแกรม (ปล. ผู้เขียนก็ยังใหม่เหมือนกัน สามารถชี้แนะได้น่ะ มาคุยกัน) ผู้เขียนจะขออธิบาย กันลืมเองก็แล้วกัน อยากให้เข้าใจมากกว่า เข้ามาก็อปโค๊ดไปแปะ โปรดใช้วิธีพิมพ์ตาม นะครับ


ร่วมสนับสนุนนักเขียนด้วยการคลิ๊กลิ้ง ด้านล่าง ขอบคุณครับ รับรองไม่มีไวรัส


Step 1. สร้าง Input Text
Step 2. รับค่าตัวแปรที่ได้จาก การสแกนมาเก็บเอาไว้ ในตัวแปร
Step 3. เช็คค่าในช่อง Input เมื่อกด ปุ่ม Button
        Step 3.1 แปลงค่าทุกช่องให้เป็นค่า String
        Step 3.2 Select เลือกฐานข้อมูล
        Step 3.3 Insert ป้อนลงฐานข้อมูล
Step 4. ตั้งค่าใน Input ให้เป็นช่องว่าง แบบค่าสตริง (" ")
Step 5. แจ้งเตือน

ตัวอย่าง code
 
String content = getIntent().getExtras().getString("CONTENT");

barcode.setText(content);
 
 
ในโค๊ดด้านบนนี้ เป็นคำสั่งดึงค่าจาก key String ของการ intent ส่งค่า และ set ค่าในของ Input ด้วยตัวแปรที่เก็บค่าเท่าไว้

โค๊ดทั้งหมด

package com.blogspot.sheepcodeblog.scannerbarcodetodatabase;

import android.content.DialogInterface;
import android.content.Intent;
import android.database.Cursor;
import android.os.Bundle;
import android.support.v7.app.ActionBarActivity;
import android.database.sqlite.SQLiteDatabase;
import android.view.View;
import android.widget.Button;
import android.widget.EditText;
import android.widget.Toast;

public class InputData extends ActionBarActivity {

    databaseScanner DBscan;
    SQLiteDatabase db_manage ;

    @Override    protected void onCreate(Bundle savedInstanceState) {
        super.onCreate(savedInstanceState);
        setContentView(R.layout.activity_input_data);

        DBscan = new databaseScanner(this);
        db_manage = DBscan.getWritableDatabase();

Step 1.

        final EditText barcode = (EditText) findViewById(R.id.editbarcode);
        final EditText name = (EditText) findViewById(R.id.editname);
        final EditText cost = (EditText) findViewById(R.id.editcost);
        final EditText where = (EditText) findViewById(R.id.editwhere); 
Step 2. 
 
        String content = getIntent().getExtras().getString("CONTENT");

        barcode.setText(content);
 
Step 3.  
 
        Button okey = (Button) findViewById(R.id.buttonok);
        okey.setOnClickListener(new View.OnClickListener() {
            public void onClick(View v) {
 Step 3.1 
               String barcodeString = barcode.getText().toString();
                String nameString = name.getText().toString();
                String costString = cost.getText().toString();
                String whereString = where.getText().toString();
Step 3.2
                 if (barcodeString.length() != 0 && nameString.length() != 0 && costString.length() != 0 && whereString.length() != 0) {
                    Cursor cursor = db_manage.rawQuery("SELECT * FROM " + databaseScanner.TABLE_NAME                            + " WHERE " + databaseScanner.COL_ID + "= '" + barcodeString + "'"                            + " AND " + databaseScanner.COL_NAME + "= '" + nameString + "'"                            + " AND " + databaseScanner.COL_COST + "= '" + costString + "'"                            + " AND " + databaseScanner.COL_WHERE + "= '" + whereString + "'", null);
Step 3.3
                     if (cursor.getCount() == 0) {
                        db_manage.execSQL(" INSERT INTO " + databaseScanner.TABLE_NAME + " ("                                + databaseScanner.COL_ID + ", " + databaseScanner.COL_NAME                                + ", " + databaseScanner.COL_COST + ", " + databaseScanner.COL_WHERE + " ) VALUES ( '"                                + barcodeString + "', '" + nameString + "', '" + costString + "', '" + whereString + "'); ");

Step 4
                       barcode.setText(" ");
                        name.setText(" ");
                        cost.setText(" ");
                        where.setText(" ");
Step 5
                        Toast.makeText(getApplicationContext(), " เพิ่มข้อมูลเสร็จสิ้น ", Toast.LENGTH_LONG).show();
                    } else {
                        Toast.makeText(getApplicationContext(), " มีข้อมูลนี้แล้ว", Toast.LENGTH_LONG).show();
                    }
                } else {
                    Toast.makeText(getApplicationContext(), "กรุณป้อนให้ครบทุกช่อง", Toast.LENGTH_LONG).show();
                }

            }
        });
    }

    public void onStop() {
        super.onStop();
        DBscan.close();
        db_manage.close();
    }


}


โค๊ดตัวอย่าง ฐานข้อมูล

package com.blogspot.sheepcodeblog.scannerbarcodetodatabase;

import android.content.Context;
import android.database.sqlite.SQLiteDatabase;
import android.database.sqlite.SQLiteOpenHelper;

/** * Created by sheepcodeblog.blogspot.com on 11/4/15. */public class databaseScanner extends SQLiteOpenHelper {

    private static final String DB_NAME = "scanDb";
    private static final int DB_VERSION = 1;

    public static final String TABLE_NAME = "scanTable";

    public static final String COL_ID = "id_scan";
    public static final String COL_NAME = "name";
    public static final String COL_COST = "cost";
    public static final String COL_WHERE = "date";

    public databaseScanner (Context context) {
        super(context, DB_NAME, null, DB_VERSION);
        // TODO Auto-generated constructor stub    }

    @Override    public void onCreate(SQLiteDatabase db) {
        // TODO Auto-generated method stub
        String create =  "CREATE TABLE " + TABLE_NAME + " (" + COL_ID +" INTEGER PRIMARY KEY, " + COL_NAME + " TEXT, " + COL_COST + " TEXT, " + COL_WHERE + " TEXT);" ;
        String insert = "INSERT INTO " + TABLE_NAME + " (" + COL_ID + " , " + COL_NAME + " , " + COL_COST + " , " + COL_WHERE + " ) VALUES ( '8888','SheepCode','blog','Blogspot.com');";
        db.execSQL(create);
        db.execSQL(insert);

    }

    @Override    public void onUpgrade(SQLiteDatabase db, int oldVersion, int newVersion) {
        // TODO Auto-generated method stub        db.execSQL("DROP TABLE IF EXISTS " + TABLE_NAME);
        onCreate(db);

    }


}

ตัวอย่างโค๊ด XML 

<LinearLayout xmlns:android="http://schemas.android.com/apk/res/android"
xmlns:tools="http://schemas.android.com/tools"
android:layout_width="fill_parent"
android:layout_height="fill_parent"
android:orientation="vertical"
android:weightSum="1">


<LinearLayout
android:orientation="vertical"
android:layout_width="match_parent"
android:layout_height="125dp"
android:layout_weight="0.44"
android:weightSum="1">

<TextView
android:layout_width="wrap_content"
android:layout_height="wrap_content"
android:text="บันทึกสินค้า"
android:id="@+id/textView"
android:layout_gravity="center_horizontal" />

<LinearLayout
android:orientation="horizontal"
android:layout_width="match_parent"
android:layout_height="76dp">

<TextView
android:layout_width="wrap_content"
android:layout_height="wrap_content"
android:text="barcode"
android:id="@+id/txtbarcode" />

<EditText
android:layout_width="match_parent"
android:layout_height="wrap_content"
android:id="@+id/editbarcode"
android:layout_gravity="center_horizontal" />
</LinearLayout>

<LinearLayout
android:orientation="horizontal"
android:layout_width="match_parent"
android:layout_height="match_parent">

<TextView
android:layout_width="wrap_content"
android:layout_height="41dp"
android:text="ชื่อสินค้า"
android:id="@+id/txtname" />

<EditText
android:layout_width="match_parent"
android:layout_height="wrap_content"
android:id="@+id/editname" />
</LinearLayout>
</LinearLayout>

<LinearLayout
android:orientation="vertical"
android:layout_width="match_parent"
android:layout_height="163dp">

<LinearLayout
android:orientation="horizontal"
android:layout_width="match_parent"
android:layout_height="94dp">

<TextView
android:layout_width="wrap_content"
android:layout_height="wrap_content"
android:text="ราคาสินค้า"
android:id="@+id/txtcost" />

<EditText
android:layout_width="match_parent"
android:layout_height="wrap_content"
android:id="@+id/editcost" />
</LinearLayout>

<LinearLayout
android:orientation="horizontal"
android:layout_width="match_parent"
android:layout_height="match_parent">

<TextView
android:layout_width="wrap_content"
android:layout_height="wrap_content"
android:text="ที่ไหน"
android:id="@+id/txtwhere" />

<EditText
android:layout_width="match_parent"
android:layout_height="wrap_content"
android:id="@+id/editwhere" />
</LinearLayout>
</LinearLayout>

<LinearLayout
android:orientation="horizontal"
android:layout_width="match_parent"
android:layout_height="77dp">

<Button
android:layout_width="187dp"
android:layout_height="wrap_content"
android:text="ตกลง"
android:id="@+id/buttonok" />

<Button
android:layout_width="match_parent"
android:layout_height="wrap_content"
android:text="ยกเลิก"
android:id="@+id/buttoncancel" />
</LinearLayout>

</LinearLayout>


นอกจากนี้ ขอพูดถึงข้อเสียในการทำแอพแบบเสียหน่อย 

ข้อแรกก็คือ ในการทำระบบโดยการใช้ Intent รู้สึกค่อนข้างจะสแกนได้ช้า และการควบคุมโฟกัสช้า ขณะที่ทำการสแกน เมื่อเปรียบเทียบกับ การเปิดแอพ barcode scan โดยตรง แค่สกิดนิดเดียวก็แสดงผลแล้ว ถือว่ายังได้ผลที่ยังไม่ดีนักสำหรับการนำไปใช้ในเชิงธุรกิจ

แต่ยังไม่สามารถบอกได้ 100% เพียงแค่บอกว่า ใช้วิธี Intent นี้แล้ว ช้า...

ถ้าหากลองใช้วิธีนำ library ของ zxing มาต่อยอด ก็อาจจะเร็วขึ้นก็ได้

ข้อสอง คือ ถ้าหากผู้ซื้อนำไปใช้จริงๆแล้วละก็ ค่อนข้างเสียเวลาที่จะต้องสแกนและป้อน ข้อมูลเอง ถ้าหากว่าราคามีการปรับเปลี่ยนอยู่ตลอดเวลา ผู้ใช้คงเซ็งน่าดู ก็ยังถือว่า ยังใช้ไม่ได้


ร่วมสนับสนุนนักเขียนด้วยการคลิ๊กลิ้ง ด้านล่าง ขอบคุณครับ รับรองไม่มีไวรัส


แล้วทำแอพนี้ขึ้นมาทำไม

1. เรียนรู้การใช้ สแกนบาร์โค๊ด
2. รู้ว่า ทำได้จริง แต่ยังไม่ดี ต้องพัฒนาเพิ่ม
3. เอามันส์

ยังไม่จบ 

บทถัดไป จะสแกนแล้วนำมาแสดงผล เป็น ผลรวม โชว์ค่า


วันศุกร์ที่ 30 ตุลาคม พ.ศ. 2558

[Project] แอพพลิเคชั่นจำศัพท์ แบบง่ายๆ ในนาม Vocab Card

ในยุคปัจจุบันภาษาอังกฤษนับว่าเป็นภาษาที่ เรียกได้ว่าเป็นภาษาที่สำคัญ หรือเป็นภาษาที่สองไปเสียแล้ว ในการสื่อสารยุคนี้ เพราะฉะนั้น หากได้รับการฝึกฝนตั้งแต่วัยเยาว์ก็จะได้เปรียบเป็นอย่างมากเพราะ เมมโมรี่ของสมองยังว่างพอที่จะจับยัดคำศัพท์เข้าไปได้มากๆ ด้วยการท่องจำ แต่หากว่ามาฝึกฝนตอนวัยชาน(ชรา) แล้วนั้นวิธีที่สอนเด็กๆ เช่น การท่องจำก็คงจะไม่เข้าหัวกันอีกต่อไป อย่างผู้เขียนก็เช่นกัน เคยฝึกแบบท่องวันละ 10 คำ 20 คำ แต่สมองก็ไม่จำสักที แล้วก็เบื่อไปในที่สุด ที่พอจะรับได้ก็ต้องใช้เวลามากกว่า เด็กๆ อายุน้อยๆ 

ผู้เขียนจึงเปลี่ยนวิธีมาเป็นการ อ่านกวาด(Scanning) เพื่อดูว่าคำศัพท์คำไหนที่ยังไม่รู้ หรือยังจำไม่ได้ ก็จดเอาไว้ก่อนแล้วจึงเอามาแปลทีหลัง เมื่อแปลคำศัพท์แล้วก็ เอามาอ่านอีกรอบพร้อมกับ ดูคำศัพท์ แต่การใช้วิธีนี้ ผู้เขียนคิดว่าจะต้องรู้ grammar พอสมควรถึงจะอ่านสนุก เป็นเทคนิคส่วนตัวสำหรับผู้เขียนอะน่ะ ก็ใครถนัดแบบไหนควรหาให้เจอด้วยตัวเอง 


พอผู้เขียนใช้วิธีนี้แล้วเนี่ย ปัญหาใหญ่ที่สุดเลยก็คือ ลายมือไม่สวย @@ 
.
.
.
ก็ส่วนหนึ่ง ฮ่าๆ 

อันที่จริงแล้ว คือ อ่านๆไปก็เจอคำศัพท์ ที่เจอแล้ว เจออีก เจอซ้ำ เจอซาก 

เจอจนจำได้ เอ่อ...แล้วมันไม่ดีตรงไหนหรือเปล่า บ่นซะ

ก็เอาเป็นว่าผู้เขียน ก็ได้ไอเดียว่า จะทำอย่างไรดีน่ะ ที่จะบันทึกคำศัพท์ ที่ตัวเรายังจำไม่ได้ แล้วก็ไม่ต้องบันทึกซ้ำมันอีก สามารถเก็บอยู่ในที่เดียวกัน 

อืมมม คิด คิด คิด ..... จดลงกระดาษ ก็เก็บไม่หมด จดลงสมุดก็แล้ว ใหญ่ไป ถือไม่ถนัด 

เอาเป็นว่า ขายเลยแล้วกัน จูงใจกันมาหลายบรรทัดแล้ว กับทีวีไดเร็ค ขอนำเสนอ แอพพลิเคชั่น Android ชื่อ Vocab Card 

จอร์น : สวัสดีซ่ารา

ซ่าร่า : ว่าไงค่ะจอร์น


ร่วมสนับสนุนนักเขียนด้วยการคลิ๊กลิ้ง ด้านล่าง ขอบคุณครับ รับรองไม่มีไวรัส


ร่วมสนับสนุนนักเขียนด้วยการคลิ๊กลิ้ง ด้านล่าง ขอบคุณครับ รับรองไม่มีไวรัส


เหตุผลที่ ผู้เขียนตั้งชื่อว่า Vocab Card ก็มีที่มาจากว่า เทคนิคของบางคนในการฝึกภาษา ก็จะใช้วิธี เปิด การ์ดคำศัพท์มานั่งอ่านในเวลาว่าง


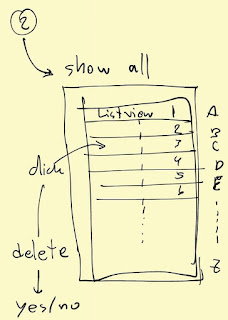
ผู้เขียนจึงเกิดไอเดียขึ้นมาทันที ก็เช่นเคยว่า วาดระบบขึ้นมาก่อนจะทำโครงงานอะไรสักอย่าง


ไก่เขี่ยมากๆ 

ก็จะแบ่งเป็น สามฟังก์ชัน ได้แก่ ป้อนคำศัพท์ เปิดคำศัพท์ และลบคำศัพท์

เมื่อกดปุ่มป้อนคำศัพท์ก็จะแสดงผลออกในหน้านี้


ในการป้อนข้อมูลนั้นเป็นการใส่ตามใจผู้ใช้ได้เลย

เมื่อกดตกลง ก็จะแสดง alert ขึ้นมาว่า เพิ่มคำศัพท์เสร็จสิ้น


เมื่อมีป้อนก็ต้องมีเปิด ออกไปหน้าแรก แล้วก็กดปุ่ม เปิดคำศัพท์จะได้หน้านี้ทันที

 เราสามารถที่จะกดดูเพื่อความชัดเจน ที่ใหญ่ขึ้นได้


เมื่อเราไม่ต้องการคำศัพท์คำนี้แล้ว เพราะ เราจำได้แล้ว ก็สามารถที่จะลบคำๆนั้นออกจากฐานข้อมูลของเรา ก็เช่นเดิมออกไปหน้าแรกแล้ว ก็กด ลบคำศัพท์
เมื่อเข้ามาจะมีหน้าตาที่ไม่ต่างกับ ปุ่มเปิดคำศัพท์เลยอย่างกะฝาแฝด พูดง่ายๆ codeโปรแกรมเหมือนกัน อย่างกะแกะ (Sheep Code) อย่าเข้าใจผิดว่าไปก็อปเขามาล่ะ ผิดกฎหมายเด้อ.... 


ร่วมสนับสนุนนักเขียนด้วยการคลิ๊กลิ้ง ด้านล่าง ขอบคุณครับ รับรองไม่มีไวรัส


ก็เมื่อกดที่คำศัพท์คำที่เราไม่ต้องการ ก็จะมี ไดอะล็อกขึ้นมาถามเราว่าจะลบหรือไม่นั้นเอง


เมื่อกด ใช่ ก็จะขึ้น alert ขึ้นมาว่า ลบคำศัพท์เสร็จสิ้น


ออกจากหน้าเดิมก่อน แล้วค่อยกลับมาเปิดอีกที จึงจะหายไป.....
เท่านี้ละครับ โปรแกรมตัวนี้

จริงๆแล้ว สำหรับ นักพัฒนา Android ที่คุ้นเคยกับแอพพลิเคชั่นแบบนี้ก็คงจะทำเองได้ไม่ยาก เพราะก็แค่ มี Input เข้าไปใน database แล้ว Select ออกมาโชว์บน ListView เท่านี้ก็เสร็จแล้ว

ก็ผู้เขียนมี Link ให้ download Application ตัวนี้ไว้ให้ เพื่อว่าบางคนอยากได้เอาไปใช้ ตามนี้เลยครับ VocabCard[google Drive]

หรือหากว่าใครอยากจะเอา Code ไปพัฒนาต่อก็ Link นี้ครับ 
SourceCode_VoCab[googleDrive] 

ขอขอบคุณ คุณเอก Android( GDE ) แห่ง Android~Sleepless for less

http://www.akexorcist.com/2013/02/android-code-cursor-sqlite.html
http://www.akexorcist.com/2013/01/android-code-query-sqlite.html 


วันศุกร์ที่ 23 ตุลาคม พ.ศ. 2558

[Project] มาสร้าง point of sale ด้วย java กันเถอะ ตอนที่ 3

พื้นฐานความรู้คอมพิวเตอร์ ระดับ กลาง-สูง *JAVA - OOP - Data Structure 

สวัสดีครับ ด้วยบทความ [Project] มาสร้าง point of sale ด้วย linux command และ java เปรียบเทียบกันเถอะ ตอนที่ 1  ผู้เขียนได้ลองออกแบบและพัฒนา POS ด้วย bash Linux Command ที่เกิดจากแรงบันดาลใจ จากใบเสร็จรับเงินจึงได้ลองออกแบบดูว่าสามารถพัฒนาได้หรือไม่ ผลก็ออกมาว่าสามารถใช้งานได้ในระดับหนึ่ง แต่ก็ยังติดปัญหาในเรื่องของการเก็บข้อมูล จึงได้พัฒนาต่อในภาษา java เพราะว่าผู้เขียนจะได้เอา โปรแกรมโครงสร้างข้อมูลที่มีอยู่แล้วมาพัฒนาการเก็บข้อมูลได้ทันที ไม่ต้องพัฒนา ในส่วนของ bash ให้เสียเวลาจึงได้บทที่ 2 ออกมา เป็นที่มาของชื่อที่บอกว่าเอามาเปรียบเทียบกันระหว่างสองภาษานี้นั่นเอง เพราะไม่ต้องมาพัฒนาในส่วนที่ยังทำไม่ได้ให้เสียเวลา อาจจะนานจน หมดกำลังใจทำต่อเลยก็ได้
[Project] มาสร้าง point of sale ด้วย linux command และ java เปรียบเทียบกันเถอะ ตอนที่ 2 
แต่ด้วยโปรแกรมยังไม่เป็นที่พอใจสำหรับผู้เขียน จึงต้องพัฒนาต่อๆไป เท้าความในบทที่ 2 คือผู้เขียนได้พัฒนา ในรูปแบบ การป้อนข้อมูลสินค้าจาก user ทุกครั้งที่มีการเริ่มต้นโปรแกรมใหม่ทุกๆครั้ง โดยไม่มีการเก็บข้อมูลสินค้า แล้วสามารถที่จะเลือกมาใช้ได้ในทันที ในบทความนี้จึงพัฒนาโปรแกรมต่อในส่วนของ การเก็บข้อมูลด้วย ผู้อ่านและผู้ที่สนใจจำเป็นจะต้องมีความรู้โครงสร้างข้อมูลเป็นพื้นฐานในการอ่านโค๊ดโปรแกรมด้วย และโปรแกรม ได้แบ่ง โปรแกรมออกเป็นส่วนให้เลือกใช้ ได้แก่การเพิ่ม ข้อมูลสินค้า (add) แสดงรายการลิสสินค้า (show) และ นำรายการสินค้ามาเลือกด้วย ID ข้อมูลสินค้านั้นมาคำนวน (cal) ไหนๆก็เปลี่ยนมาพัฒนาทางภาษา java แล้วก็เปลี่ยนชื่อบทความไปเลยแต่ ยังเป็นบทความยาวต่อเนื่องอยู่ครับ ก่อนอื่นมาดู flowchart ที่ผู้เขียนออกแบบไว้กันก่อน


ภาพที่ 1


ภาพที่ 2


ภาพที่ 3


ภาพที่ 4


ในการออกแบบนั้น เมื่อได้ลองทำตามกับที่ออกแบบเอาไว้ ก็จะรู้ได้ว่าปัญหานั้นเยอะมาก ไม่สามารถทำตามที่คิดไว้ได้อย่างสมบูรณ์ จึงต้องเปลี่ยนแปลงไปตามความเหมาะสม 

มาลองอ่านโค๊ด ตัวอย่างกัน ปล. ใส่โปรแกรมที่ช่วยให้ดูโค๊ดง่ายๆแล้ว แต่ทำไม่มันเปลี่ยน... T T เศร้าแปป


ร่วมสนับสนุนนักเขียนด้วยการคลิ๊กลิ้ง ด้านล่าง ขอบคุณครับ รับรองไม่มีไวรัส


โค๊ดตัวอย่าง


import java.io.FileNotFoundException;
import java.io.PrintWriter;
import java.io.UnsupportedEncodingException;
import java.rmi.server.ExportException;
import java.util.Scanner;

public class javaPOSSLT2 {
   
    Node newNode;
    static Node head ;
    static Node curr;
    Node prev;
    static String record;
    static String amoun;
   
    //เพิ่มโหนดในลิ้งลิสท์
    public void add(Object newId,Object newItem,Object newPrice){
        if(head==null){
            newNode = new Node(newId,newItem,newPrice);
        }
        else {
            newNode = new Node( newId,newItem, newPrice, head);
        }
        head = newNode;
    }
   
    //ค้นหาข้อมูลในลิ้งลิสซ์
   
    public boolean searchItem(Object id,Object item, Object price){
        curr = head ;
        prev = null ;
        boolean status = false;
       
        while(curr != null){
            Object[] Arr = null;
            if(curr.getItem() == Arr){
                status = true;
                break;
            }else{
                prev = curr;
                curr = curr.getNext();
            }
        }
       
        if(status){
            return true;
        }else{
            return false;
        }
    }
   
    //ลบข้อมูลในลิส
    public void deleteNode(Object id,Object item, Object price){
        if(searchItem(id,item, price)){
            if(prev == null){
                head = curr.getNext();
            }else{
                prev.setNext(curr.getNext());
            }
        }else{
            System.out.println("Not found Item");
        }
    }
   
    //แทรกโหนดในลิส
    public void insert(Object iteminsert, Object newId,Object newItem,Object newPrice){
        newNode = new Node(newId,newItem, newPrice);
        if(searchItem(iteminsert,newId, newPrice)){
            if(prev == null){
                newNode.setNext(curr);
                head = newNode;
           
            }else {
                newNode.setNext(curr);
                prev.setNext(newNode);
            }   
        }else{
            if (head == null){
                newNode.setNext(curr);
                head = newNode;
               
            }else if(curr == null){
       
            prev.setNext(newNode);
            }
        }
    }
   
    //แสดงข้อมูลในลิส
    public Object[] showdata(){
        Object[] Arr = null;
        curr = head;
        while (curr != null){
           
            Arr = curr.getItem();
            System.out.print(Arr[0]);
            System.out.print("         " + Arr[1]);
            System.out.print("            " + Arr[2]);
            System.out.println();
            System.out.println();
            curr = curr.getNext();
        }
        System.out.println();
       
        return Arr ;
    }
   
public Object[] data(){
        Object[] Arr = null;
        curr = head;
        while (curr != null){
           
            Arr = curr.getItem();
            curr = curr.getNext();
        }
        System.out.println();
       
        return Arr ;
    }

public static Object[] record_sale(){
   
    javaPOSSLT2 Item = new javaPOSSLT2();
    String in_id = Item.id_return();
    String in_amount = Item.amount_return();
       
        Object Arr[] = null;
       
        curr = head;
   
        while (curr != null){               
   
                Arr = curr.getItem();
       
                if(Arr[0].equals(in_id)){
                    System.out.print(Arr[1]);
                    System.out.print("         " + Arr[2]);
                    System.out.print("            " + in_amount);
               
                }
                curr = curr.getNext();
        }
       
        System.out.println();
       
    return  Arr  ;
}

private String id_return() {
    // TODO Auto-generated method stub
    return record;
}

public static void id_return(String id_i){
    record = id_i;
}

private String amount_return() {
   
    // TODO Auto-generated method stub
    return amoun;
}

public static void amount_return(String amount_i){
    amoun = amount_i;
}

static int plus = 0;
static int money = 0;
   
@SuppressWarnings("static-access")
public static void main(String[] args) throws FileNotFoundException, UnsupportedEncodingException {
       
        javaPOSSLT2 Item = new javaPOSSLT2();
        javaPOSSLT2 export = new javaPOSSLT2();
       
        System.out.println("ยินต้อนรับเข้าสู่โปรแกรม POS By SheepCode Version1.3");
       
       
        while(plus != 1){
       
        System.out.print("เลือกโปรแกรม ?");
        Scanner y = new Scanner(System.in);
        String program = y.nextLine();
               
            switch(program){
               
                //เพิ่มสินค้า
            case "add": // เพิ่มชื่อสินค้า
               
                System.out.println("กรุณาป้อนป้อนรหัสสินค้า");   
                System.out.print("รหัสสินค้า :");   
                Scanner d = new Scanner(System.in);
                String id = d.nextLine();

                System.out.println("กรุณาป้อนชื่อสินค้า");   
                System.out.print("ชื่อสินค้า :");   
                Scanner i = new Scanner(System.in);
                String item = i.nextLine();
               
                System.out.println("กรุณาป้อนราคาสินค้า");   
                System.out.print("ราคาสินค้า :");   
                Scanner p = new Scanner(System.in);
                String price = p.nextLine();
               
                Item.add(id, item,price);   
                               
                break;
               
            case "show" :
                System.out.println("แสดงรายชื่อสินค้า........");
                System.out.println("id       "+"ชื่อสินค้า              " +"ราคาสินค้า                  ");       
                Item.showdata();
                break;
               
            case "cal" :
                int sum = 0;
                int price2 = 0;
                int check_loop = 1 ;
                String price1  ;
               
                while (check_loop != 0){
                   
                System.out.print("ป้อนไอดีสินค้า:");
                Scanner id_in = new Scanner(System.in);
                String id_i = id_in.nextLine();
               
                Object Arr[] = Item.data();
                           
                    curr = head;
                   
                    while (curr != null){               
                   
                        Arr = curr.getItem();
                   
                        if(Arr[0].equals(id_i)){
                   
                            System.out.print("ป้อนจำนวนสินค้า :");
                            Scanner amount = new Scanner(System.in);
                            String amount_i = amount.nextLine();
                            Item.id_return(id_i);
                            Item.amount_return(amount_i);
                            price1 = (String) Arr[2] ;
                            int amount_int = Integer.parseInt(amount_i);
                            int price1_int = Integer.parseInt(price1);
                            price2 = amount_int * price1_int ;
                       
                            sum = sum + price2 ;

                            }
                                curr = curr.getNext();                                           
                        }
                    System.out.println("ชื่อสินค้า              " +"ราคาสินค้า                  "+"จำนวนสินค้า");   
                    Item.record_sale();

                    System.out.print("ใส่ข้อมูลเพิ่มหรือไม่  :");
                    Scanner check_y = new Scanner(System.in);
                    String check = check_y.nextLine();
               
                    if(check.equals("yes")){
                       
                        check_loop = 1;
                       
                    }else{
                            check_loop = 0;
                         }
                                       
            }   
                               
                System.out.print("รับเงินมาจำนวน  :");
                Scanner money = new Scanner(System.in);
                int money_in = money.nextInt();
               
                double net = sum/1.07;
                double vat = sum - net ;
                int change = money_in - sum;
               
                System.out.println("NAME   : Sheep Code Service");
                System.out.println("BRANCH : Sheep baby");
                System.out.println("TEL    : 02-123-4567");
                System.out.println("NUMBER : ID9999999999");
                System.out.println("RECEIP : SKLSheepCode");

                System.out.println("ราคารวม :          " +  sum + "          บาท");
                System.out.println("ราคาสุทธิ :          " +  net + "          บาท");
                System.out.println("ภาษี:                   " +  vat + "          บาท");
                System.out.println("เงินที่ได้รับจากลูกค้า:                   " +  money_in + "          บาท");
                System.out.println("เงินทอน :            " +  change + "          บาท");
               
                break;   
           
            }               

                System.out.print("คุณต้องการออกจากโปรแกรมหรือไม่ ?");
                Scanner z = new Scanner(System.in);
                String zes = z.nextLine();
               
                if (zes.equals("yes") ){
                    plus = 1;
                }else{
                    plus = 0;
                   
                }   
           
            }
   
        System.out.print("Bye Bye");
           
        }
       
}


ผลการทดสอบและผลลัพท์ โค๊ดที่ได้ออกแบบ
 
เริ่มโปรแกรม
โปรแกรม add


สามารถที่จะป้อน รหัสสินค้าเท่าไรก็ได้เท่าที่เราใส่ จากตัวอย่างนี้ ผู้เขียน ใส่ไว้แค่ สามอย่าง


ร่วมสนับสนุนนักเขียนด้วยการคลิ๊กลิ้ง ด้านล่าง ขอบคุณครับ รับรองไม่มีไวรัส


โปรแกรม show


 โปรแกรม Cal


ในส่วนโปรแกรม cal ผู้ใช้สามารถที่จะเลือก ID ของสินค้าที่ใส่เอาไว้ออกมา จากนั้น ก็ ใส่จำนวน สินค้า เสร็จเรียบร้อย โปรแกรมจะถามต่อว่า ใส่ข้อมูลเพิ่มหรือไม่ ถ้าตอบ yes ก็จะใส่เพิ่มเติม แต่ถ้า no โปรแกรมจะเข้าสู่การคำนวนราคา และ แสดงผล ออกมาให้เราเห็นด้านล่าง


บ๊าย บาย
 
 
Blogger Templates